🏪 How to Set Up an Impact Marketplace
Create a fully branded shopping experience that drives fundraising through community commerce.
The Impact Marketplace (IM) is a powerful tool that turns everyday purchases into meaningful support for your nonprofit. Supporters shop from partnered businesses, and a portion of every sale automatically contributes to your fundraising campaign.
Every Marketplace belongs to a Campaign, and the Marketplace feature must be enabled when you create the campaign.
This cannot be changed later.
This guide walks you through how to set up your Marketplace—from creating the campaign to configuring branding, connecting a custom subdomain, and enabling Marketplace features.
1. Create a New Campaign and Enable the Marketplace Feature
You can ONLY enable an Impact Marketplace when creating a new campaign.
When you create a campaign in the Supporter Gateway, you’re presented with a list of optional fundraising modules:
✔ Team Fundraising
✔ Marketplace
✔ Auction
✔ Event Ticketing
To create an Impact Marketplace:
👉 Check the box next to “Marketplace.”
This unlocks all Marketplace features for the campaign.

❗ You cannot add a Marketplace to an existing campaign later.
You must select it during creation.
2. Open the Newly Created Campaign
Once the campaign is created:
- Go to Supporter Gateway → Campaigns
- Find your campaign in the list
- Click Open
This brings you into the campaign’s admin dashboard.
3. Access the Impact Marketplace Settings Panel
Inside the campaign dashboard:
- Look at the left-hand sidebar
- Click Impact Marketplace

This opens your Marketplace configuration page, where you will:
- Set up your custom domain
- Configure branding and navigation
- Enable Marketplace modules
- Link the Campaign beneficiary
- Exclude businesses if needed
4. Connect a Custom Subdomain (Required)
This gives your Marketplace a fully branded, professional URL.
To create a seamless experience for supporters, your Impact Marketplace runs on a subdomain of your own website such as:
shop.yournonprofit.orgmarket.yourorganization.comimpact.yourdomain.org
To begin, enter the URL you’d like to use for your Impact Marketplace. Use your website’s domain (e.g., mydomain.com) and add the prefix you want to create your subdomain. After you enter the desired address, the page will refresh and display additional settings and instructions.
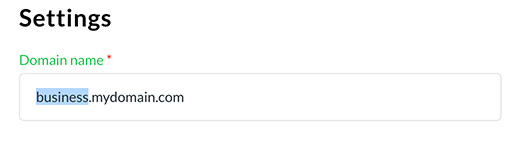
Example: using “business” as the domain prefix (a.k.a Host Name).
On the Marketplace Setup Page You Will See:

Domain Name
This is the subdomain you want users to visit (e.g., shop.yournonprofit.org)
CNAME
This is the Our Mayberry-provided target you will point your DNS to.
It will look like:
campaignname.ourmayberry.com
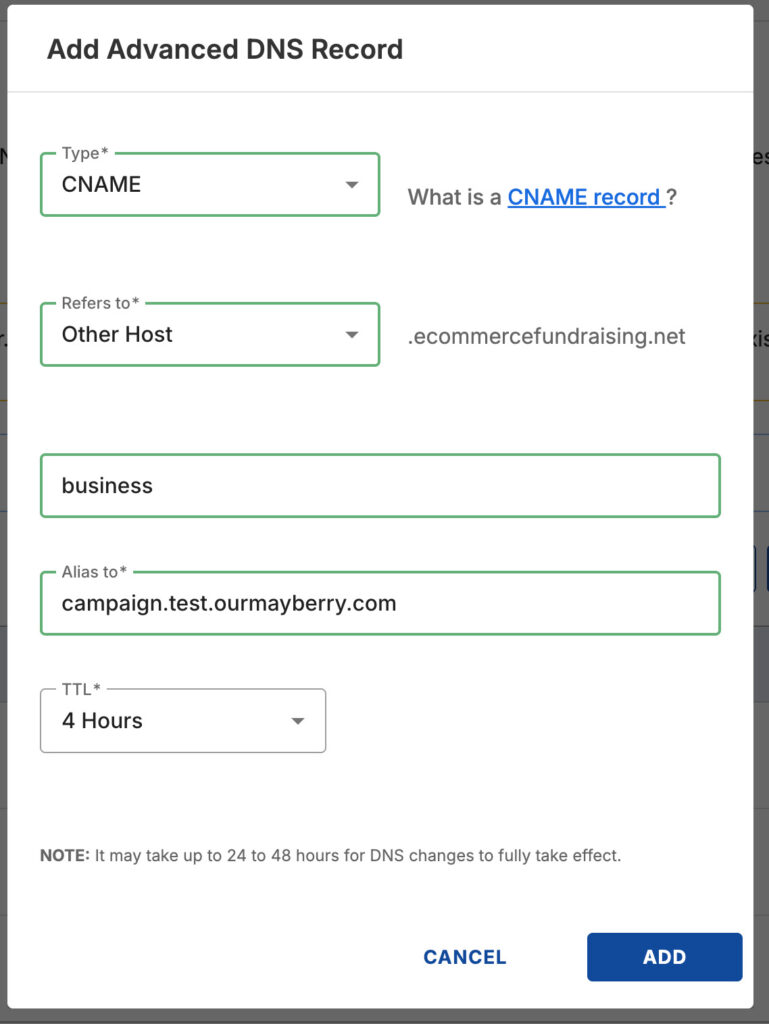
5. Add a CNAME Record in Your DNS
To connect your domain:
- Log in to your domain host (GoDaddy, Cloudflare, Namecheap, Squarespace, etc.)
- Open the DNS or DNS Records section
- Add a new CNAME record:
Host/Name:
Your chosen subdomain prefix
(e.g., shop, marketplace, impact, etc.)
Value / Points To:
The CNAME value provided in Our Mayberry
(e.g., campaignname.ourmayberry.com)
TTL:
Leave default (typically 1 hour)
Important Clarification
Most domain providers do not require a trailing dot at the end of the CNAME target.
Use:
campaignname.ourmayberry.com
Avoid adding:
campaignname.ourmayberry.com.
Some DNS panels will display or append the dot internally, but this is handled automatically.
If your DNS host rejects the trailing dot, simply remove it.
Safe rule: Enter the CNAME without the trailing dot unless your DNS provider specifically instructs otherwise.
6. Customize Marketplace Settings
After connecting your domain, configure the look, feel, and behavior of your Marketplace.
Main Site URL
This defines where supporters go when they click your logo in the navigation bar.
Examples:
- Your homepage
- The campaign homepage
- A donation page
Impact Marketplace Beneficiaries
If your campaign benefits multiple programs or chapters, select which beneficiary the Marketplace supports.
Exclude Businesses
You can hide certain partnered businesses from appearing in this Marketplace.
Theme Colors
Customize your:
- Text color
- Background color
to match your nonprofit’s branding.
7. Enable Marketplace Features
Choose which modules to display:
✔ Marketplace
Main shopping area where supporters browse offers.
✔ Gift Cards
Displays all business gift cards available from Marketplace partners.
✔ Directory
Shows all businesses partnered with your organization.
You can enable or disable any combination of features.
8. Save and Launch Your Marketplace
Click Update Settings to apply changes.
Once your CNAME resolves (usually within 1–60 minutes):
✔ Your Impact Marketplace goes live
✔ Businesses you partner with appear automatically
✔ Their offers populate instantly
✔ Supporters can shop on your branded subdomain
✔ All contributions track in real time
9. Summary
Setting up an Impact Marketplace provides your nonprofit with:
- A fully branded online shopping experience
- A sustainable, year-round fundraising engine
- Automatic contributions from partnered businesses
- Seamless domain integration via CNAME
- Real-time visibility into impact and sales
- Full control over customization and navigation
It’s the easiest way to empower supporters to shop with purpose — directly under your nonprofit’s brand.